Sigfox Bot
Sigfox is a long range, low power radio communication system that is ideal for the Internet of Things devices. The Sigfox Bot provides integration with the Sigfox cloud platform to enable callbacks to push your IoT data into Tinamous.
A number of Sigfox devices are available, perhaps the easiest for Makers is the Arduino MKR FOX 1200
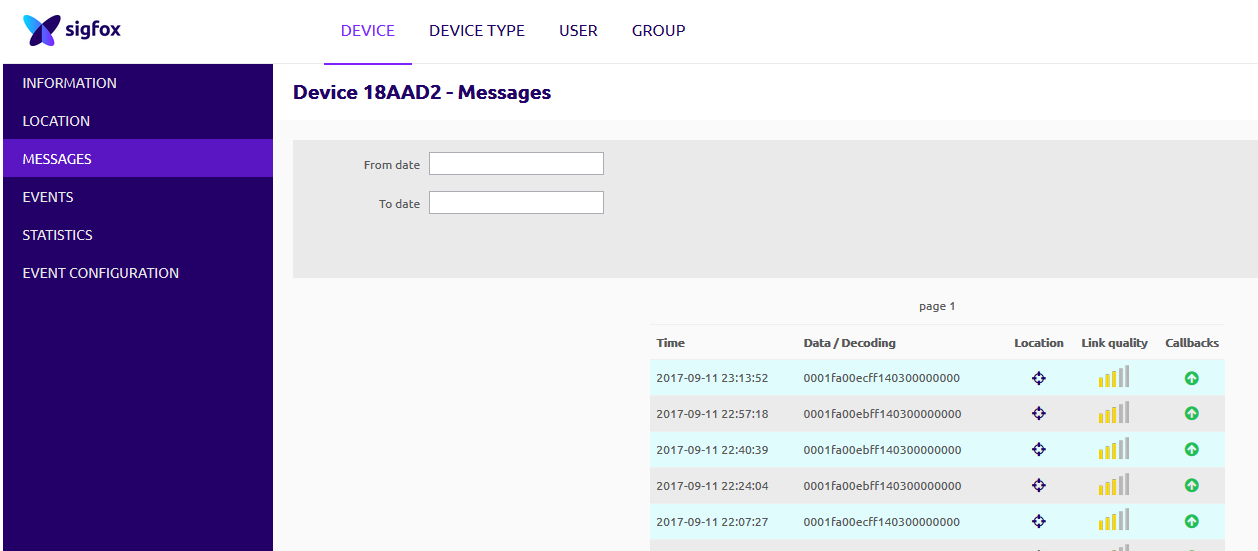
The Sigfox bot will automatically map each of the your Sigfox devices to a Tinamous device, either when they push data to the callback endpoint or when the Sigfox cloud API is enabled, once the data is pushed into Tinamous it can be visualized on the device page along with historical data and location mapping, shown on dashboards, used for notifications, exported or any other function that Tinamous supports for any regular device measurement.
Getting started:
- From the Bots page, Add a Sigfox Bot using the Add -> Add Sigfox Bot option from the top right drop down box.
-
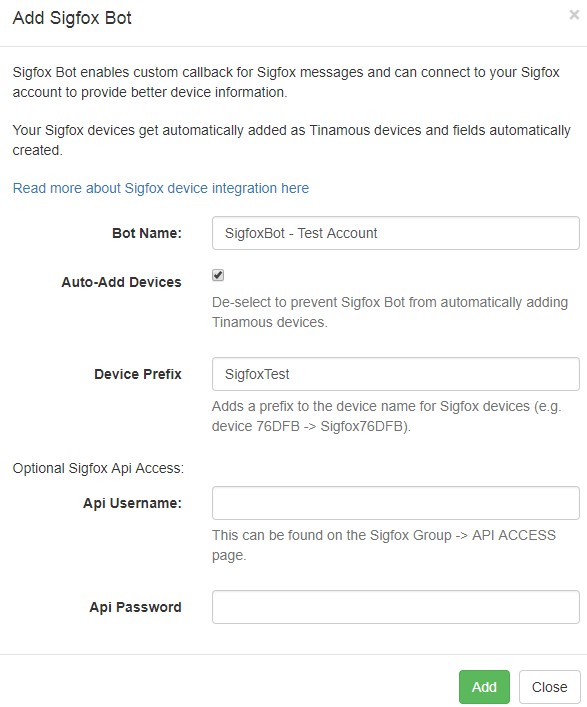
Enter the details requested on the Add Sigfox Bot dialog box
- Bot Name is the friendly display name for your bot. If you need have more than one Sigfox account you may wish to name them differently here.
- Auto-Add Devices allows the automatic creation of Tinamous devices for each Sigfox device.
- Device Prefix is optional and used when naming Tinamous devices to help identify the device (i.e. A device name in Sigfox is something like "Device 0018AAD2", with the prefix "Sigfox" it will be called "Sigfox Device 0018AAD2" with the username @SigfoxDevice0018AAD2 in Tinamous).
-
If you wish to get additional information about your device enter the API Login and Password in the optional section.
- Sigfox API keys can be generated on the group API Key page.
- From https://backend.sigfox.com/group/list. select your group.
- Click API ACCESS
- Click [New] in the top right corner
- Give it a friendly name (e.g. Tinamous)
- Give it appropriate permissions (TBD: select all for now)
- Copy and paste the Login and Password to the Add Sigfox Bot dialog box
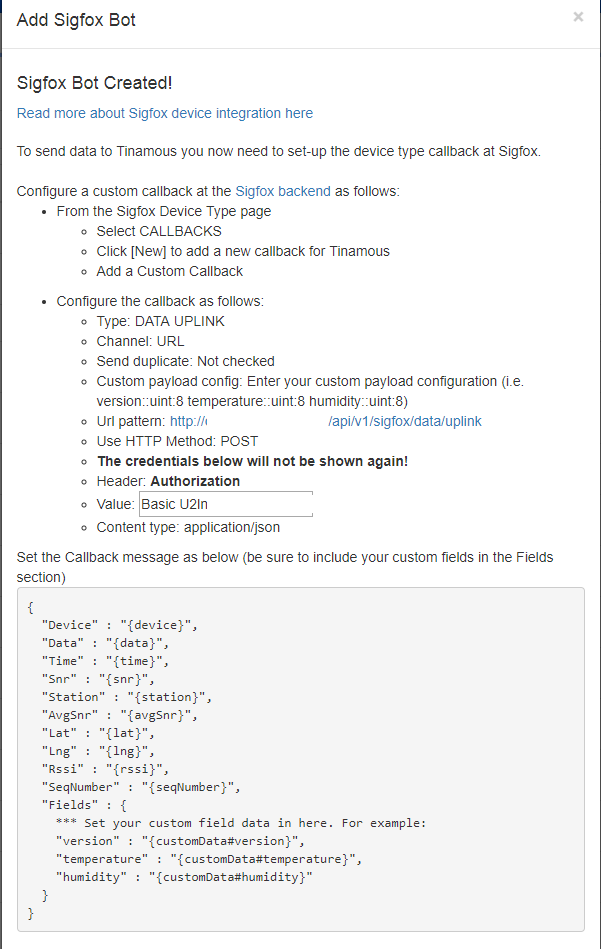
- Click the Add button and wait for the call back information to be shown. Be sure not to close the dialog box.
- IMPORTANT! Some of the information presented in the dialog box is only available at this time.
Setting up the Sigfox Callback:
It is important to do this before closing the Add Sigfox Bot dialog box as the information you need is contained on the dialog box and is not available when it is closed. The Sigfox callback must be configured correctly to get measurements posted to Tinamous. We are not able to set this up via their API.If you closed the dialog box simply delete the Sigfox bot and add another one.
Add a Custom Callback:
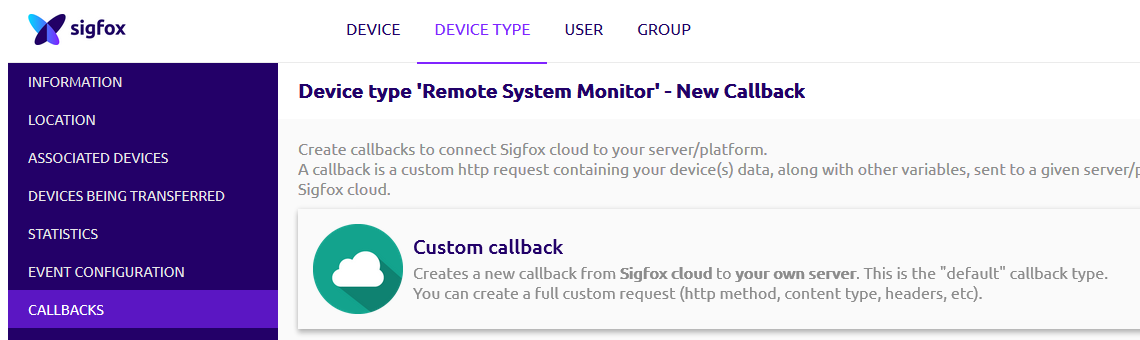
Configure a custom callback at the Sigfox backend:- Navigate to the Sigfox Device Type page
- Select CALLBACKS
- Click [New]
- Click Custom callback
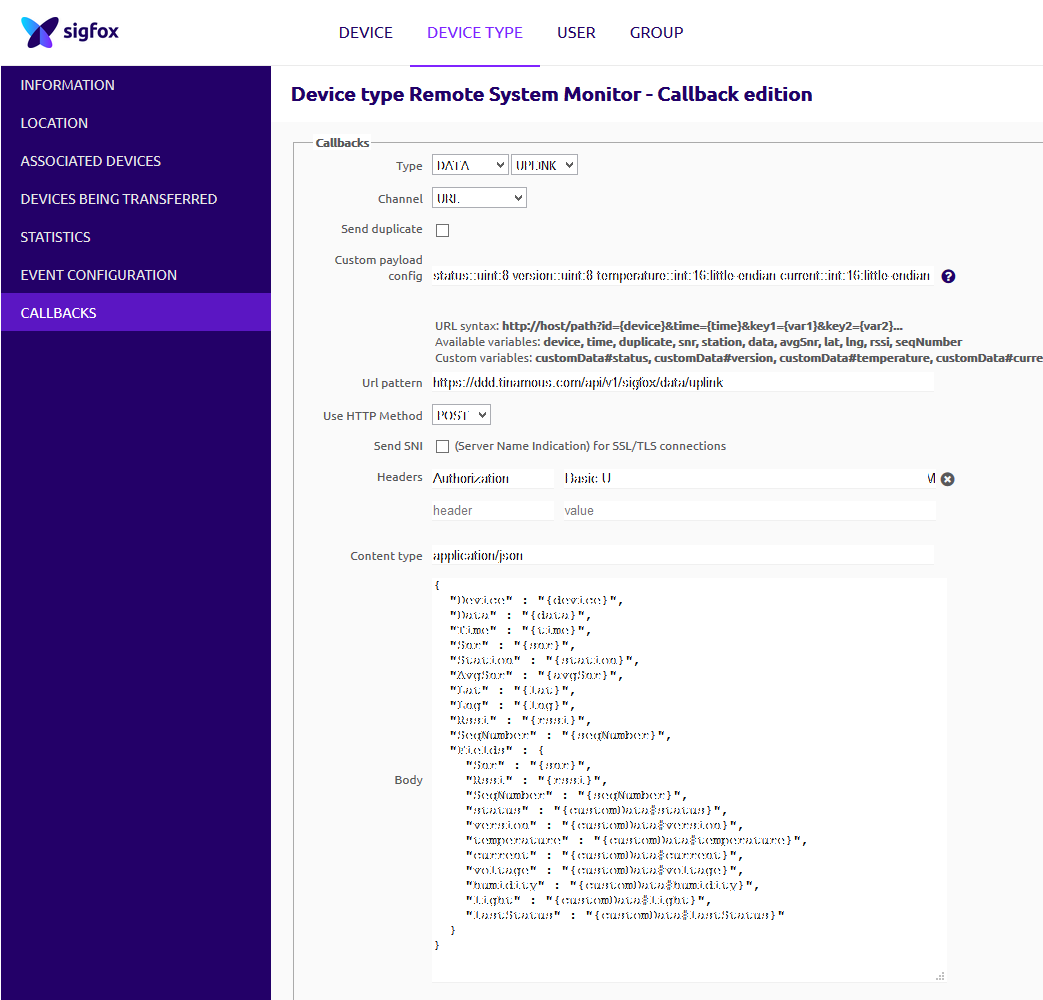
Configure the callback as follows:
- Type: DATA UPLINK
- Channel: URL
- Send duplicate: Not checked
-
Custom payload config: Enter your custom payload configuration. For example:
version::uint:8 temperature::uint:8 humidity::uint:8
- Url pattern: Copy and paste the url given on the dialog box
- Use HTTP Method: POST
- Header: Authorization
- Value: Enter the header value as shown on the dialog box
- Content type: application/json
-
Body: Replace the contents of Fields with your custom fields from the payload.
{ "Device" : "{device}", "Data" : "{data}", "Time" : "{time}", "Snr" : "{snr}", "Station" : "{station}", "AvgSnr" : "{avgSnr}", "Lat" : "{lat}", "Lng" : "{lng}", "Rssi" : "{rssi}", "SeqNumber" : "{seqNumber}", "Fields" : { "Version" : "{customData#version}", "Temperature" : "{customData#temperature}", "Humidity" : "{customData#humidity}" } } - Tip: You can include fixed information in the payload Fields section if you wish (e.g. custom device type identifier)
- Click OK, checking for any validation error messages.
Done:
- The Sigfox Bot will appear in the bots list (you may need to refresh it).
- If you gave the bot API access it will set-up Tinamous devices for your Sigfox devices and try to refresh this list with details on a regular basis.
- If the bot does not have API access new Sigfox devices will appear as data is pushed to Tinamous.
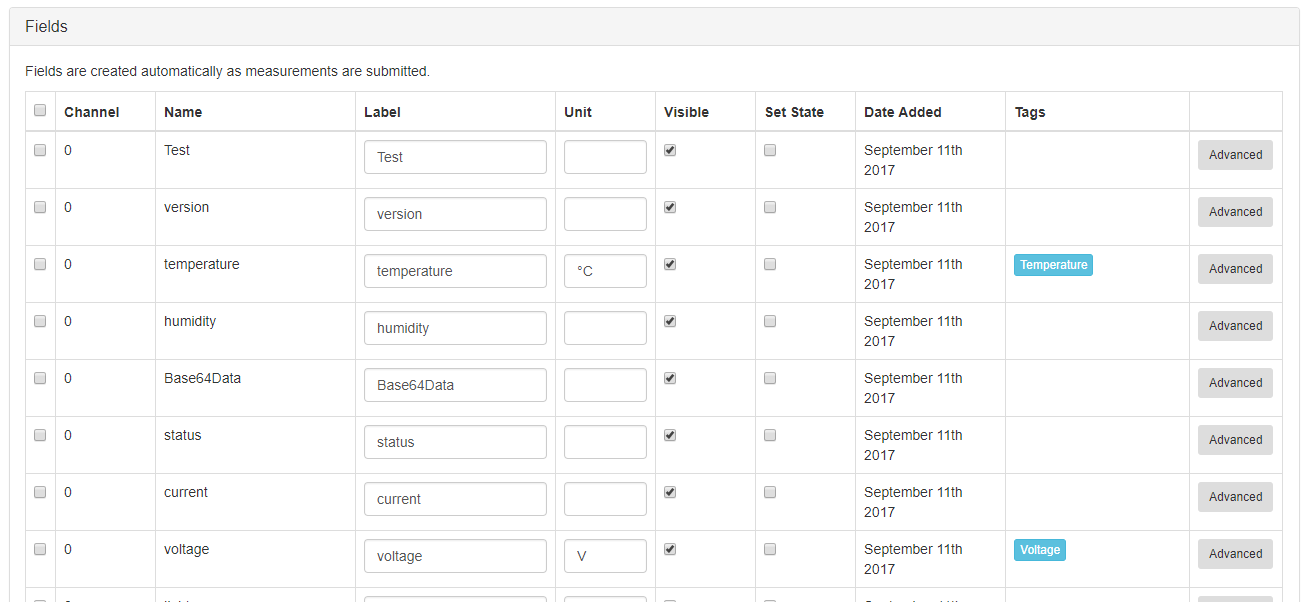
- Fields for the devices will be automatically created from the Fields section in the callback body. (e.g. version, temperature and humidity in this example)
The Tinamous Sigfox Bot stores your API Key encrypted in our database. You can revoke access for this key from the Sigfox backend should you need to.
Fault Finding:
If your callback isn't working check the following:- Try adding an email callback to ensure your device data is getting through to Sigfox.
- Check the callback status is OK at Sigfox.
- If it is showing not authorized check the Header values on the callback
- If it is showing a bad request it maybe missing the device details "Device" from the body
- If it is showing a bad request it check you set the content type to application/json
- If it was working and has stopped check you have not deleted the Sigfox Bot.
Modify Bot Details:
It is not currently possible to modify the Sigfox Bot once created. This will become available in the future. Please contact support if you need help with this.Modify Device Details:
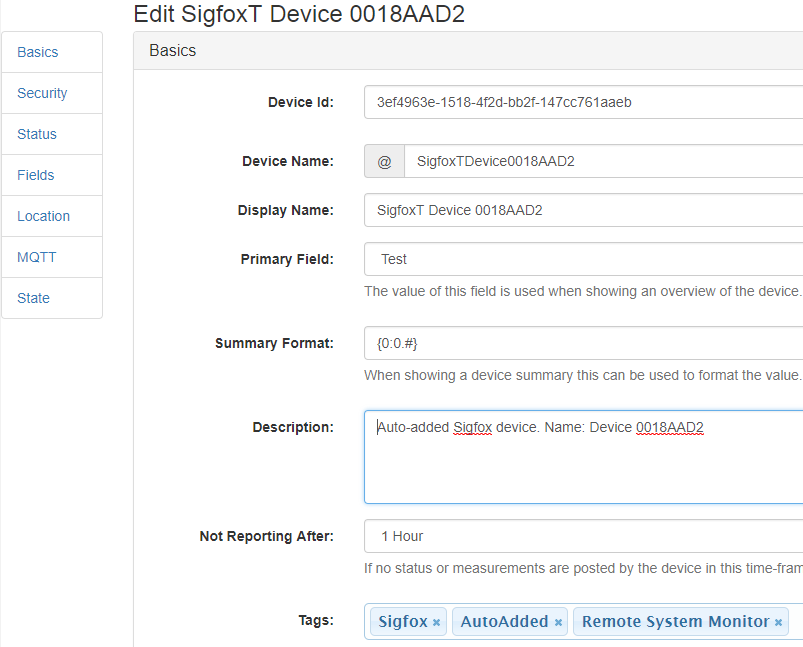
- From the Devices page find your device and click Edit.
- You can modify the basic Tinamous device details (i.e. display name) as you would do normal devices using Edit from the devices page. No changes are made to the Sigfox backend.
- You can not modify the devices @Name this is fixed.
- You should not give your device API permissions as it does not need to log into Tinamous.
- Once a device has published a measurement the fields will be listed and can be edited.
- When a new device added to Tinamous it is tagged with [Sigfox], [AutoAdded] and the Sigfox device type (if known), these tags can be removed or modified as needed.
Field Value Corrections:
When working with constrained data packet sizes like the 12 bytes available through Sigfox it is common to try and fit numbers into as fewer bytes as possible. A prime example of this
is converting a float value (e.g. measured temperature of 17.7°C) into a byte value (177) such that you can use a single byte rather than 2, 4 or 8 as might be required for the floating point value.
Tinamous supports applying calibrations to a field measurement using the y=mx + c equation. This can be used to reverse the conversion made on the micro controller.
For example actual temperature = 0.1 x [Sigfox data value] + 0 will convert our byte value of 177 back to the original 17.7 value.
- Edit the device as described above. Be sure to do this after an initial measurement has been transmitted to allow the fields to be populated.
- Find the field that needs to be adjusted and click the [Advanced] button on the right hand side
- Enable calibration and set slope to 0.1 and offset to 0
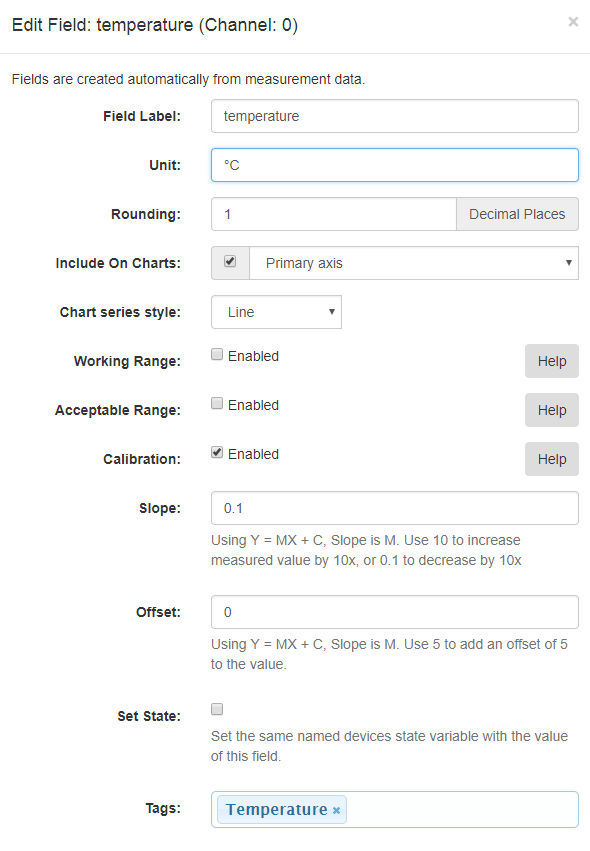
- This calibration will be applied to the measured value as it is received before being stored and actioned on.
- At this time, this needs to be applied to each each Sigfox device that is the same device type. In a future version we'll allow for a common adjustment based on Sigfox device type.
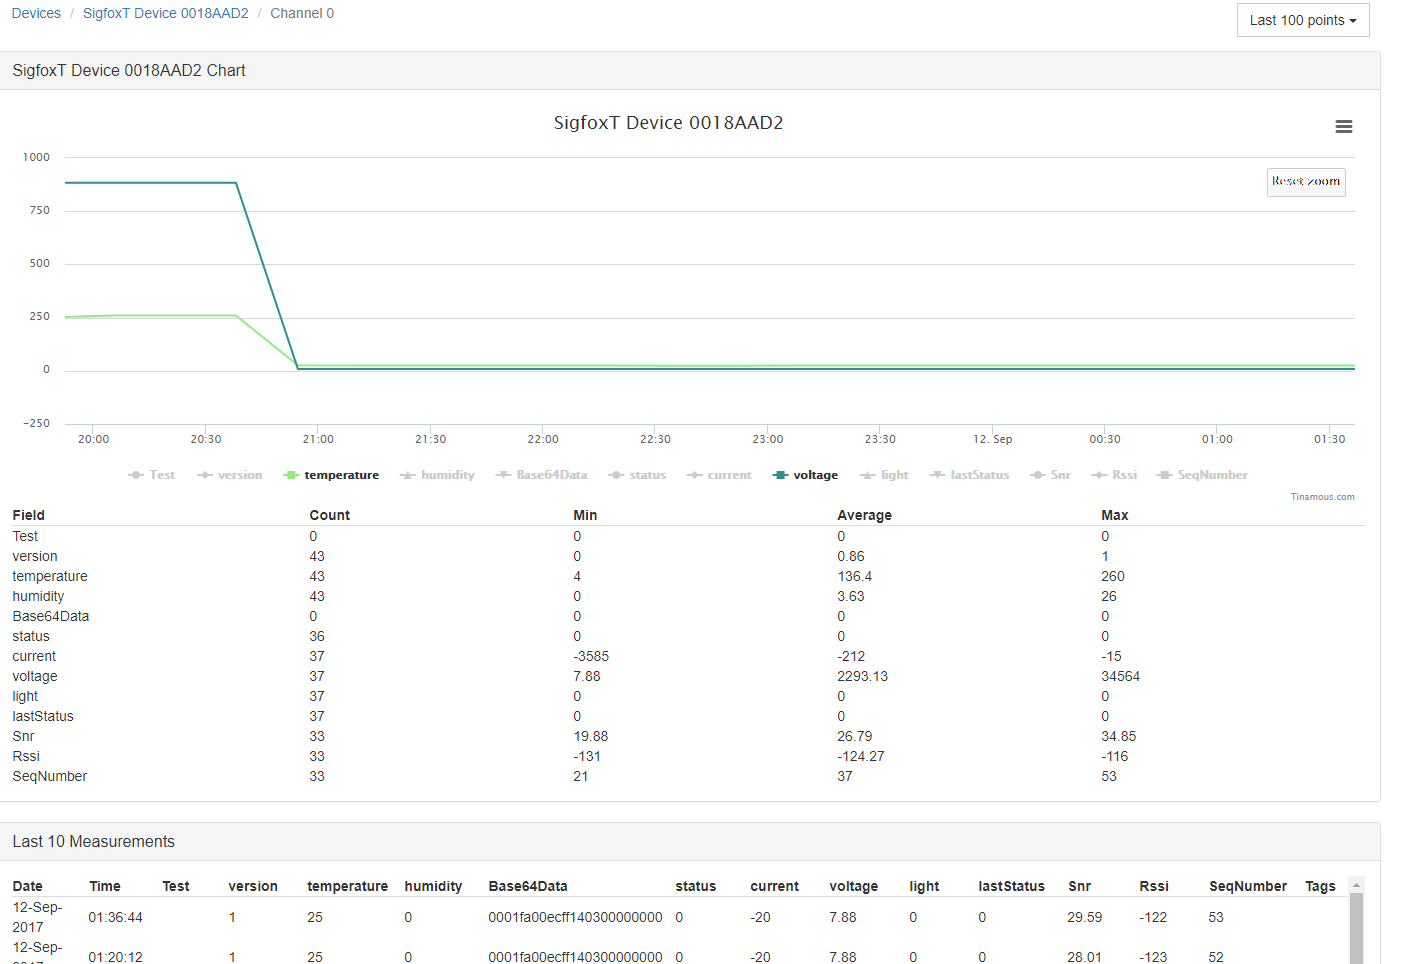
- The below chart shows the effect of applying calibrations to the temperature and voltage fields.
Advanced Callback Body:
Note the additional fields in the Fields section used when configuring the Sigfox callback to including signal to noise and received signal strength values from the Sigfox base station as well as the message.
{
  "Device" : "{device}",
  "Data" : "{data}",
  "Time" : "{time}",
  "Snr" : "{snr}",
  "Station" : "{station}",
  "AvgSnr" : "{avgSnr}",
  "Lat" : "{lat}",
  "Lng" : "{lng}",
  "Rssi" : "{rssi}",
  "SeqNumber" : "{seqNumber}",
  "Fields" : {
    "Snr" : "{snr}",
    "Rssi" : "{rssi}",
    "SeqNumber" : "{seqNumber}",
    "Version" : "{customData#version}",
    "Temperature" : "{customData#temperature}",
    "Humidity" : "{customData#humidity}",
    "Message" : "Hello World!",
  }
}