The Things Network Bot
The Things Network bot provides an integration with The Things Network for data ingress into Tinamous from your LoRaWAN devices, allowing for charting, dashboards, alerting and other functionality in Tinamous to be applied to your LoRaWAN devices.
Tinamous supports V3 of The Things Network as well as the previous V2 version.
Since June 2021 only V3 subscriptions have been possible with The Things Network putting all V2
applications into read only mode, and The Things Network will retire V2 in December 2021.
Any device that is compatible with The Things Network will work with Tinamous through The Things Network bot.
Your The Things Network application must have a payload formatter to decode the message into fields (i.e. temperature, humidity etc) as decoding isn't supported on the Tinamous side. Most LoRaWAN device manufacturers provide a decoder JavaScript function for use on The Things Network.
We recommend creating a unique bot for each application you have on The Things Network as this helps with automatic tagging of devices and naming. However a single bot can be used for many applications.
The bot will automatically create a new device (if that option was selected) when data is received for a device that hasn't been seen before.
Devices will be automatically tagged when created a device based on the tags set in the bot. This is useful when building dashboards and notifications to filter devices and data.
Fields are automatically added to the device based on the fields sent from The Things Network. However field label/units/tags etc need to be manually edited for each device.
See The Things Network Webhooks for more information on the webhook configuration and Payload Formatters for information on payload formatters.
Getting Started:
To create a The Things Network bot, navigate to the Bots page, and select Add -> Add The Things Network Bot option from the top right drop down box.
-
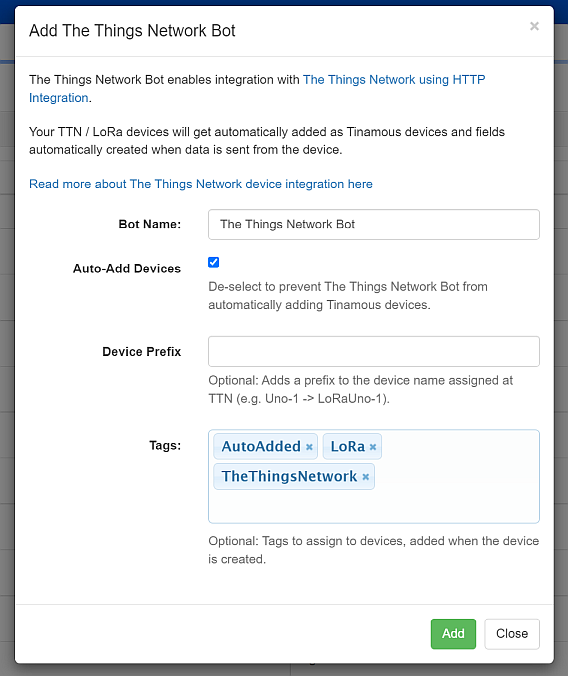
Enter the details requested on the Add The Things Network Bot dialog box
- Bot Name is the friendly display name for your bot. If you need have more than one The Things Network account you may wish to name them differently here.
- Auto-Add Devices allows the automatic creation of Tinamous devices for each LoRaWAN device as data comes into Tinamous.
- Device Prefix is optional and used when naming Tinamous devices to help identify the device (i.e. A device name in The Things Network is something like "TTNUno-1", with the prefix "LoRa" it will be called "LoRa-TTNUno-1" with the username @LoRaTTNUno-1 in Tinamous).
- Set Tags to automatically add tags to the the devices created by the TTN bot. For example your TTN application might be for environment sensing, you can automatically tag those devices "EnvironmentSensor" as Tinamous creates the device representation.
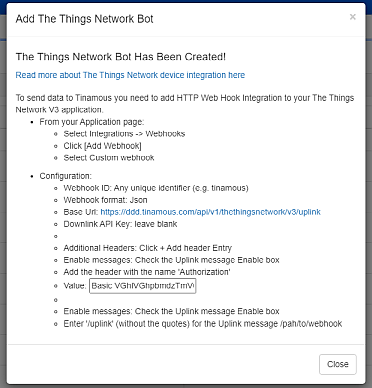
- Click the Add button and wait for the call back information to be shown. Be sure not to close the dialog box.
- IMPORTANT! The authorization information presented in the dialog box is only available at this time.
Setting up the The Things Network Integration:
It is important to do this before closing the Add The Things Network Bot dialog box as the information you need is contained on the dialog box and is not available after it is closed.
The ThingsNetwork webhook must be configured correctly to get device data posted to Tinamous. If you close the dialog box before configuration is complete simply delete the bot and add another one.
These instructions relate to The Things Network V3 Applications. TTN no longer supports adding integrations to V2 applications.
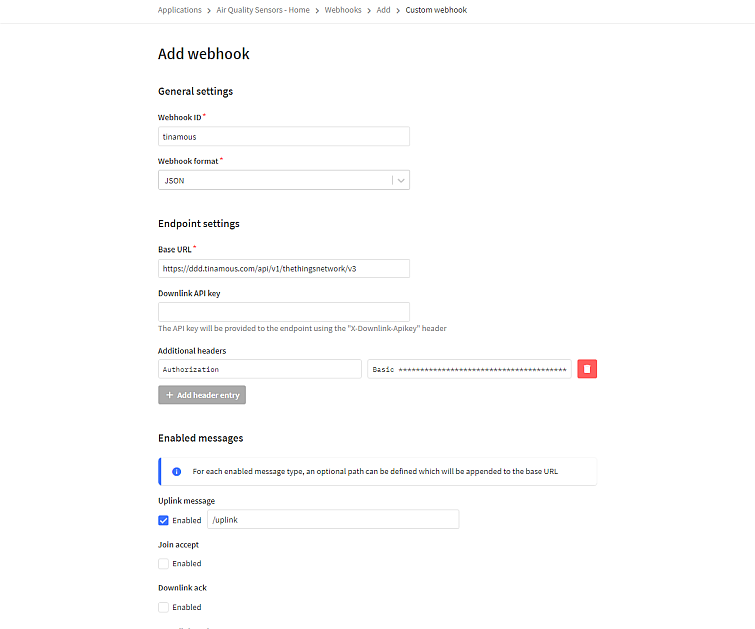
From your application, select Integrations and Webhooks from the left hand menu.
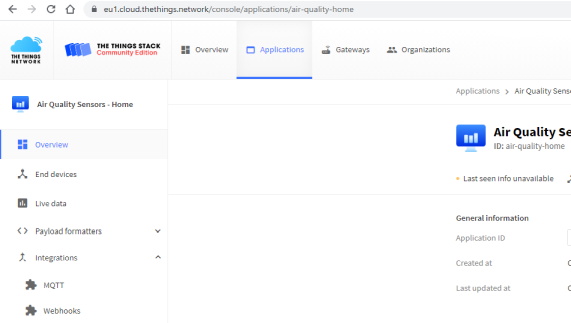
From the Webhooks page, click the [+ Add webhook] button

Select the Custom webhook option from the Webhook list
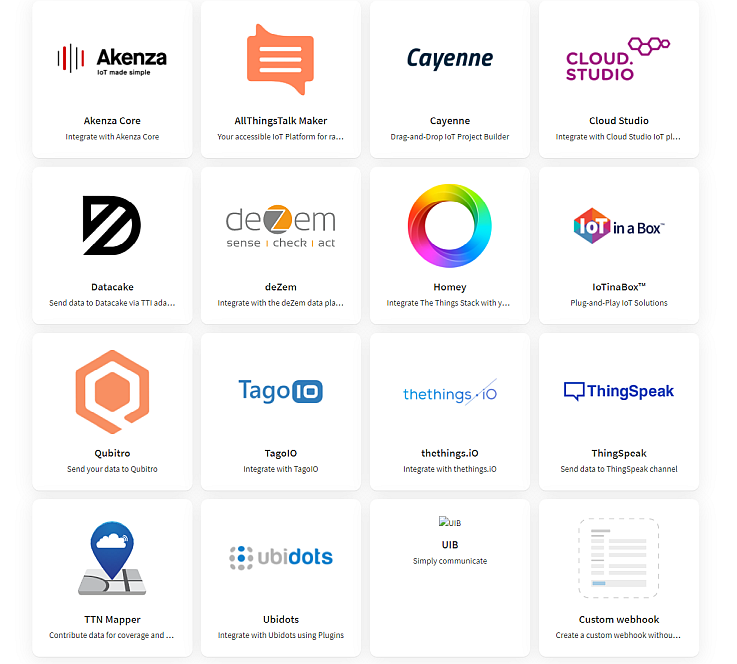
For the Webhook ID enter "tinamous" - it can be anything you like, but should be unique and meaningful for your application.
The Webhook format should be JSON
The base Url should be the Url you were shown in the Add The Things Network dialog box (without the /uplink part). i.e. "https://mytinamous.tinamous.com/api/v1/thethingsnetwork/v3"
Downlink API key can be left blank
Click the [+ Add header entry] and add a header.
You need to add an "Authorization" header with the value of the Basic auth that was shown in the dialog box. Note: If you are migrating from V2, use the authorization value from the V2 integration.
Check the "Uplink" option and add "/uplink" for the path.
Click Add webhook
You can now close the dialog box on Tinamous.
Done:
- The webhook will appear on the Webhooks integration page in The Things Network, at this time it doesn't have a test function to verify the connection works.
- The The Things Network Bot will appear in the bots list (you may need to refresh it).
- If you selected to automatically add devices, once data starts flowing in, the bot will create Tinamous devices for your The Things Network device using the End device Id the device was set to use in The Things Network (Note: this is not the Name assigned as this isn't available).
- Your application will need a payload formatter to convert the raw payload from the device into sensor values that can be read by Tinamous. If your seeing empty data for your device it's likely the formatter isn't functioning
- Fields for the devices will be automatically created from the sensor data set in the payload formatter.
Modify Bot Details:
It is not currently possible to modify the The Things Network Bot once created. This will become available in the future. Please contact support if you need help with this.Modify Device Details:
- From the Devices page find your device and click Edit.
- You can modify the basic Tinamous device details (i.e. display name) as you would do normal devices using Edit from the devices page. No changes are made to the Sigfox backend.
- You can not modify the devices @Name this is fixed.
- You should not give your device API permissions as it does not need to log into Tinamous.
- Once a device has published a measurement the fields will be listed and can be edited.
- When a new device added to Tinamous it is tagged with [TheThingsNetwork], [AutoAdded] these tags can be removed or modified as needed.
Migrating V2 to V3 Integration:
The Things Network V2 will be shutdown on 1 December 2021. To continue to receive data your application will need to be moved over to their V3 platform.
Existing The Things Network bots can be used for V3 integration, they now show the V3 uplink Url that should be used in the webhook on the bot edit page. This url should be split to remove the '/uplink' from the Base URL and include that as the Uplink path
You'll need the Authorization header value from the The Things Network V2 integration.

Setup a V3 custom webhook in The Things network following the details in the Getting Started section, using the header from the V2 integration.
If you're unable to get the authorization header, create a new bot, this will not affect device association.